Pages

Tuesday, March 14, 2017

Leprechaun Trap Roundup

Do you celebrate St. Patrick's Day? We do in a big way. We have Irish ancestors so why not, right?We do corned beef and cabbage. We wear green. And yeah that's it. HA! Well except that we do set a trap to catch a leprechaun every year. In years past the extent has been a box with a stick. The kids decided they want to go ritzy this year so we've been searching for inspiration on Pinterest. There are some amazing traps out there. Seriously. I am always so impressed by what people come up with. It is going to be hard to pick one but these are our finalists:


This crazy cute slide trap from Grey House Harbor 


This is a great upgrade to our stick and box routine from Crafts by Amanda which I love. How could a leprechaun resist that gold sprinkled rainbow? 


I love this one!!! But of course there was no link to the original on Pinterest. If you recognize it I'd love to link to it. It had to take a bunch of work.


This one from Lia Griffith is so cute! The trap door on the top spins. So clever!


This is another that where there is no link to be found. Please help! How cute is it though? It seems to be a STEM project too. It looks like it actually works. 


I am pretty sure that we are going with something like this. It is a link to flickr but it looks like it is a oatmeal container all fancied up. Love it.


Which would you choose? Are you building a leprechaun trap this year? How do you celebrate? I love new ideas. I know a lot of people think its nuts to go all out on every holiday but I think it is so fun. Holidays are my reward for the day to day hustle of being a mother. 


Tuesday, January 31, 2017

Yummy Tomato Hack

You know the veggie trays that you buy ion the grocery store? Well our family buys one for every holiday or event. We eat them up! Everything except for the cherry tomatoes. To be totally honest I am not even sure why we don't eat them. My husband and I love tomatoes but there they sat until they go bad. It is such a waste to toss them. Not only is it bad for the environment but it is also bad for the wallet. So I figured out what to do with those bad boys. Roast them!


Cut them in half, drizzle them with olive oil and toss with salt and pepper. Then roast in an oven at 400 degrees for 20 or so minutes. Make sure you watch them closely. Tomatoes have a lot of sugar in them so they burn rather easily. 


And wah-lah! Oven roasted tomatoes. They are delicious tossed with pasta and a bit of parmesan. Or sprinkled over some cottage cheese. Or scrambled up with some eggs. Yum! This tip may have been obvious to most people but I am thrilled that it finally occurred to me what to do with them. Do you have any tips to save food? I need all the help I can get. 

Friday, January 27, 2017

Third Baby


I was worried about having a third baby. Don't get me wrong, I was thrilled we were pregnant. We had tried for over a year before I got pregnant so we were definitely happy about it. The thing I was worried about was my heart making room for this new little person. It shouldn't have been a worry considering that I had already experienced the heart expanding joy of a second baby. Still it was a nagging worry in the back of my mind. I had already made room for two babes. Surely I am all loved out. Then Rose was born. You know how people say that their heart doubled when they met their new little one? When Nicco was born my heart doubled. With the birth of Lola it tripled. With Rose's first cry it quadrupled. My heart and I can now love the whole world! At times it feels as though it will burst right out of my chest. My ribs are a poor cage for all this love.

With each child that was given to me I had a change of perspective along with all that heart expanding. With Nicco my life changed from a purely temporal idea to an eternal one. With Lola I began working on being a strong female example. Having Rose in my life has changed my perspective yet again. I am now seeing that this life is a sweet gift. People always say that life is too short to be someone that you aren't. I feel that the opposite is true. Life is too long to not be the person that you truly want to be. The goal should be to live a life full of living. Redundant but true. The day to day can drag on if you are not being true to what you want. Then before we know it the years have flown by. It is a vicious trick of time. Now all I need to figure out is who I want to be. What do I want to be? What do I want to spend my life doing? Who knows. Maybe it is better to focus on what I want to spend my time doing right now as opposed to worrying about my whole life.

I do know that I want to spend as much time as possible with my family and friends creating sweet memories. That is my motivation for working this blog. Making crafts, having parties, sharing meals and creating memories. It should be fun! Life should be fun. Lets share a life full of living.

Friday, December 18, 2015

Merry Christmas Ramona Avenue Readers!

Hello dear friends! We want to wish you a very Merry Christmas and a Happy New Year! We are spending quality time with our family and friends and enjoying them, and we hope you are doing the same with your loved ones! 
We will be back on Jan 5. 
See you then!

Thursday, November 19, 2015

Ribbon Chain Garland

This post is a little late for fall and Thanksgiving but you know how it is! Time flies when you are having fun! I have a ton of decor for Halloween and almost as much for Christmas. It seems like the month between Halloween and the Christmas season just seems to speed by for me. So Thanksgiving seems to get the shaft a little bit in my home. Leftover pumpkins and handprint turkeys are the extent of the decorations around here. I decided to remedy that and add a couple of garlands this year. I made a pom pom garland. Which was crazy easy so I won't even go into details about it. The one I am most excited about is a ribbon chain garland! 

Did you make paper chains as a kid? I loved making them. I would make them and then take them apart and trash them and start over. This ribbon chain garland will last for years hopefully!


Supplies:
craft glue
coordinating ribbon

I used 3 spools of 1 and 1/2" ribbon. The glue I used was Elmers Craft Bond glue. I actually wouldn't recommend this glue. It says quick dry but it definitely wasn't. When I make another for Christmas I will probably use fabric-tac or a good old glue gun. 


The strips of ribbon are cut to about 7 inches long. After all the cutting was said and done I ended up with 15 strips of each color.  


After that I put a thick line of Craft Bond and made the first loop. You want to make sure that you use enough glue. The brown grosgrain ribbon seemed to just soak up the glue so it needed a much healthier line of glue. The seam is just overlapped. I didn't do any fancy overlapping to try and hide it. The ribbon loops can be turned once it is hung so the seam is in the back, am I right?


Yay three loops! Now all you have to do is loop them through each other and wah-lah!


This is what I mean about the seam. I just cut glue and stuck. Easy Peasy. After you have looped all your ribbon together, let it dry overnight. Just to make sure it is 100% dry.


Oh I love how it turned out. I am thinking of making another with thin ribbon to layer with this one and of course there are Christmas ones coming. It went together fast and it was a total bargain. The cost with the glue was less than 10 dollars. That's my kind of craft! 

Do you like to make your holiday decor? We'd love to see any posts or instagram pics of your DIY holiday decor! Tag us @ramonaavenue! Or leave a link to your post in the comments.

Peace out! -AnneMarie 


Thursday, October 22, 2015

Halloween Nails! Throwback Thursday!

Anne Marie did a great job with her nail tutorial! Come and see!! 

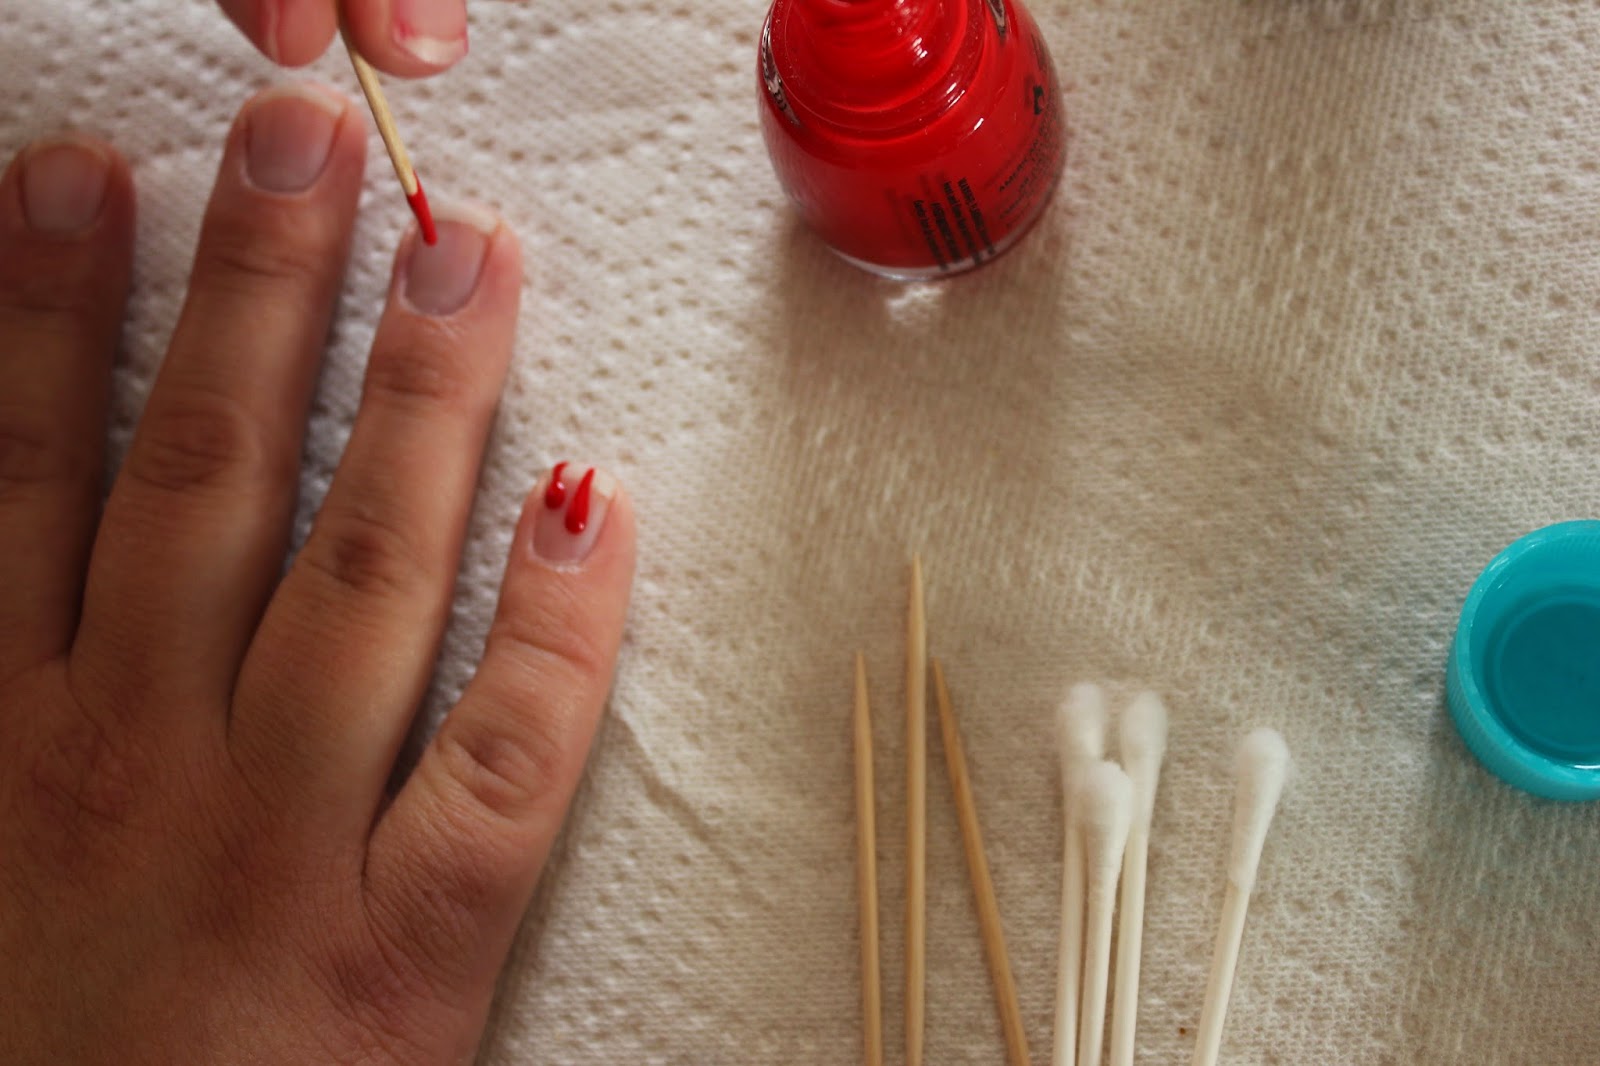
I am coming at you today with a cute and wicked easy Halloween nail tutorial. This is a little momentous for me. I have never had a steady enough hand or the patience to do a lot of cute nail art. Dripping blood? It isn't precision or neat. Just my style!


The tools:
red nail polish
toothpicks
Q-tips
nail polish remover


To start you dip a toothpick in the red nail polish and drip drops on your nails. Then take the toothpick and drag it through the dots towards the tip of your nail. Those are the streaks of blood.


Immediately after you finish your streaks of blood you need to swipe some red across the top of your fingernail. The blood needs to be dripping from somewhere! After they were all done with the first coat I swiped another coat across the top just for good measure. Then if you are like me you take your  Q-tips soaked in nail polish remover and you get the red nail polish off your fingers.


Oh so scary!


All of my nails in a row. Taking pictures of your nails or hands is awkward. I love them! Plus of they aren't perfect no one is the wiser. It is dripping blood for heavens sake!

Peace out!- AnneMarie

Wednesday, October 21, 2015

Pretzel Surprise! A quick Easy Halloween Treat!

This is a really quick and easy but very fun Halloween treat! It is fun both to eat and to make so its win win! AND you dont have to be a gourmet cook or break to bank either. YAY! Here is what you will need:

Pretzels
Melted chocolate of your choice 
candy eyes


To make you dip one end in the chocolate making sure that the chocolate still completely covers 2 holes and then while the chocolate is still wet, add the eyes. 
Allow to set and ENJOY! 
The video below will show you how! 
Please feel free to share too! 


Thursday, October 15, 2015

Throw Back Thursday- Free Halloween Printable

These are a free printable that my niece Gabby created last year for all of us. And guess what? You can still use them this year! Head over here to the post from last year to check them out and get the download! 


Gabby does all kinds of custom designs! She does prints, valentines and invitations to name a few things. You can comment below if you are interested in having here create something for you. We would be more than happy to get the message to her!

Tuesday, October 13, 2015

Pumpkin Point Farms

Warning: This is a very picture heavy post. Just to let you know!


 One of my favorite fall traditions is taking the kids to a pumpkin patch. Isn't it everyones? If my Instagram feed is any indication then yes it really is. We have been taking the kids to the same one for  6 or 7 years. It is the best. It is called Pumpkin Point Farms. For locals it is at 11800 south and 3600 west.


It is row after row of pumpkins. They are already picked which I actually love. It is great to be able to just pick the pumpkins up and go. No fuss no muss. 


They have wheelbarrows that you can take with you to really load up! 


They even have wheelbarrows for the kids. Watching the kids trying to push the tiny wheelbarrows is so stinking funny! They try so hard to control them and they just can't. I wish I had a video of it because holy moly it is so cute. 


They have tons of photo ops set up which is great. Trucks full of pumpkins, Tow Mater, a horse trailer full of hay, piles of hay bails. And so on!


So cool!


On top of all the other photo ops they have a whole row of tractors that the kids can climb on. The tractors may be my kids favorite part. Can you tell? I mean Nicco doesn't even look kind of excited, emirate?!


I swear Lola liked being there. She has just gone into the stage of hating her picture taken. Lovely.


They also have two different corn mazes. One is pretty small and one loop so it is perfect for smaller kids. They also have a much larger one that is better for bigger kids. My kids did not like the big one! They cut through the corn to get out of it. Yeah my kids are THOSE kids. 


And last but not least Mater!


So cool! 


This is the gentleman that owns the pumpkin patch. The couple that owns the Pumpkin Point Farms are charming. Plus they really seem to appreciate having people come down to their patch. Oh and they do a hay ride from 5-7 every night. BTW. So fun! Everyone should check it out! Their prices are so reasonable and they are great people. Go local!

Peace Out- AnneMarie


Tuesday, October 6, 2015

Light weight inexpensive Chain Prop for Halloween How to

We love Halloween! In our home we have made 100s of Halloween props over the years. Here is a quick easy and cheap idea that can be used in so many ways! Think decor, costumes props etc. 
You will need:
2 pieces of 6ft pipe insulator. It has the adhesive already on it. We got ours from Lowe's in the plumbing dept.
a cutting board
and a sharp knife (we used a bread knife)


Then you cut the pieces into slices and put together in a chain. 
HINT: Don't remove the adhesive backs until you have already strung the slice through the last loop.


VIDEO HOW TO!!


Click above to view


Thursday, October 1, 2015

Throwback- Welcome and a Mothers Day Idea

Emily and I have decided that we are going to repost a lot of our posts from the beginning of our blog. Enjoy!

My sister Emily and I would like to welcome you to our little corner of the internet! We are excited to work together and share a bit of our lives here with you. We like crafting and DIY. We enjoy beauty and anything fun. We like photography and food. We adore laughing and happiness. But most of all we LOVE our families! Our families are the number one motivation in all that we do and the second is fun. 

I love Mothers Day. I love having a special day set aside for thanking my mother and mother-in-law for all they do. I also love procrastinating. It is a fact of my life. To combat that little fault of mine I came up with an easy last minute Mothers Day gift.


This really doesn't need any explanation but what the heck, here it comes anyway! All it took was an Ikea frame with the photo mat already included and this crazy cute greeting card.


And voila! Instant unique artwork. It is a great way to share a cute sentiment with your mom. I think I might be keeping this one for myself, actually. Because gosh darn it I AM the bee's knees.

Tuesday, September 29, 2015

Bonneville Salt Falts

There are many places on my travel bucket list. There are places across the world. For example; Greece, the inverted tower in Portugal, Egypt(!), the pink lake in Australia- just to name a few. There are also a ton right here in Utah that I am dying to see. Right here in my backyard. 


Like this one! The Bonneville Salt Flats. The salt flats are out of this world. Like I swear they are literally from out of this world. Nick and I have meant to get out to the Salt Flats basically from the time he took a real interest in photography. It was an incredible experience.


I warn you that it is not a short drive. I mean it is relatively short in the grand scheme of things but not with children. It took us about 2 hours to get out there and about 2 hours home. For those who are local- you are ten minutes east of Wendover. You just hop on I-80 West and go. They aren't hard to find. You drive until you see a totally alien landscape and then stop. There is a rest stop with picnic tables on the north side of the freeway- that is one place you can stop but you can also just pull off the side of the freeway and check them out. I would definitely recommend the rest stop because it seems the safer option. I wish we had taken pictures of it but we didn't! Now onto the pictures. I am warning you- this is a picture heavy post. They really speak for themselves.


Nicco is taking after his daddy!


I am running in this picture! RUNNING! Just thought you oughta know. hehe You can also drive right out onto the flats. You can drive all the way to those mountains on the other side if you fancy doing that.


We must have spotted 4-6 other groups but it is so vast and so massive that you still feel totally isolated. It is a humbling experience. The strangest part to me was how quiet it was. Anyone know why it is so crazy quiet out there? I assume that the salt muffles the sound but even the sound from the freeway was gone. It is a place that you can definitely here yourself think. 


I kid you not this is the best group picture we got. 


The landscape was breathtaking. 


UGH! SO beautiful.

A couple words of advice if you go out there. If you take kids with you then you need to take things to entertain them! It is a totally rad place but my kids were bored with it pretty quick. Stay and see the stars because woah. Wear shoes that you don't care about. The salt is almost moist so your shoes will be caked in it. And it is crazy windy out there so be prepared for that. Take water and snacks- this is always my advice! 

What places are on your bucket list? I found this article listing some great places in Utah to visit. Goblin Valley is definitely going to be a place we visit soon!